Most gaming chairs fail at hour six. Not hour one, when the foam is fresh and your posture is still decent because you are paying attention. Hour six, when you are down two maps, your shoulders have crept forward, and the chair has quietly decided it would rather be a hammock. I have coached players through that exact moment for a decade, and I have learned that a gaming chair setup is a posture decision long before it is a shopping decision.
I am Jae. I coach full time in Los Angeles, I played competitive FPS for ten years at ten hours a day, and I have burned through more chairs than I have trophies. One collapsed mid-match. Another gave me a herniated disc scare at 24 that put me on a physical therapist's table for three months and nearly ended the thing I was best at. That chair was not cheap. It was just wrong: a fixed lumbar bump, armrests that only went up and down, and a bucket seat that pulled my hips forward for ten hours a day.
So this is a how-to first. The two chairs below are the ones I would hand to a player and feel fine about, at two very different budgets. But the setup steps near the end are the part that actually saves your back, and they work on the chair you already own.
Why you should trust me
I have spent the last several years coaching scrim blocks that run eight hours, and I sit in the same chair my players sit in while I do it. My rules came out of a physical therapist's office, not a marketing deck. He taught me what support actually means: a curve that lands in the small of your back, at a height you can move, with a seat that lets your knees bend and your feet reach the floor.
My boundaries are simple. Nothing gets a recommendation from me without a full eight-hour scrim day behind it. No chair gets called supportive until I have put my hands on the lumbar piece and confirmed it adjusts. And no chair gets a pass on a real height and weight fit check, because a chair that fits me at six feet may wreck a player at five foot four.
I also coach on a boring mesh task chair, and yes, I still slouch when I am losing. The difference is that I know when I am doing it now, and I know which adjustments to reach for.
How I picked and how I tested
Every chair that comes through the loft goes through the same four questions, and they are the same questions I want you to ask before you spend anything.
Is the lumbar support actually adjustable? A fixed bump is decoration. If it does not move up and down, or change depth, it will fit you by accident or not at all.
Can I lock the tilt at a healthy angle? A serious chair lets you set the recline and keep it. A chair that only bounces is a chair that decides your posture for you.
Do the armrests adjust in more than one direction? Up and down only is a compromise. Up, down, in, out, forward, back, and angled is what it takes to get your elbows under your shoulders instead of out in front of them.
Would my back still be okay after an eight-hour scrim? This is the only test that matters, and it is the one no spec sheet can answer for you.
I ran both chairs below against those questions, and I will be straight with you about what each one is and what it is not. I am not going to pretend a budget chair is the same chair as a premium one, because that lie is how people end up replacing furniture every eighteen months.
The two chairs I would put my players in
Both of these clear the basics I care about: a high back, a lumbar element, and a base that swivels so you can move between your desk and a second screen without twisting your spine. What separates them is build, material, and how long they will hold their shape.
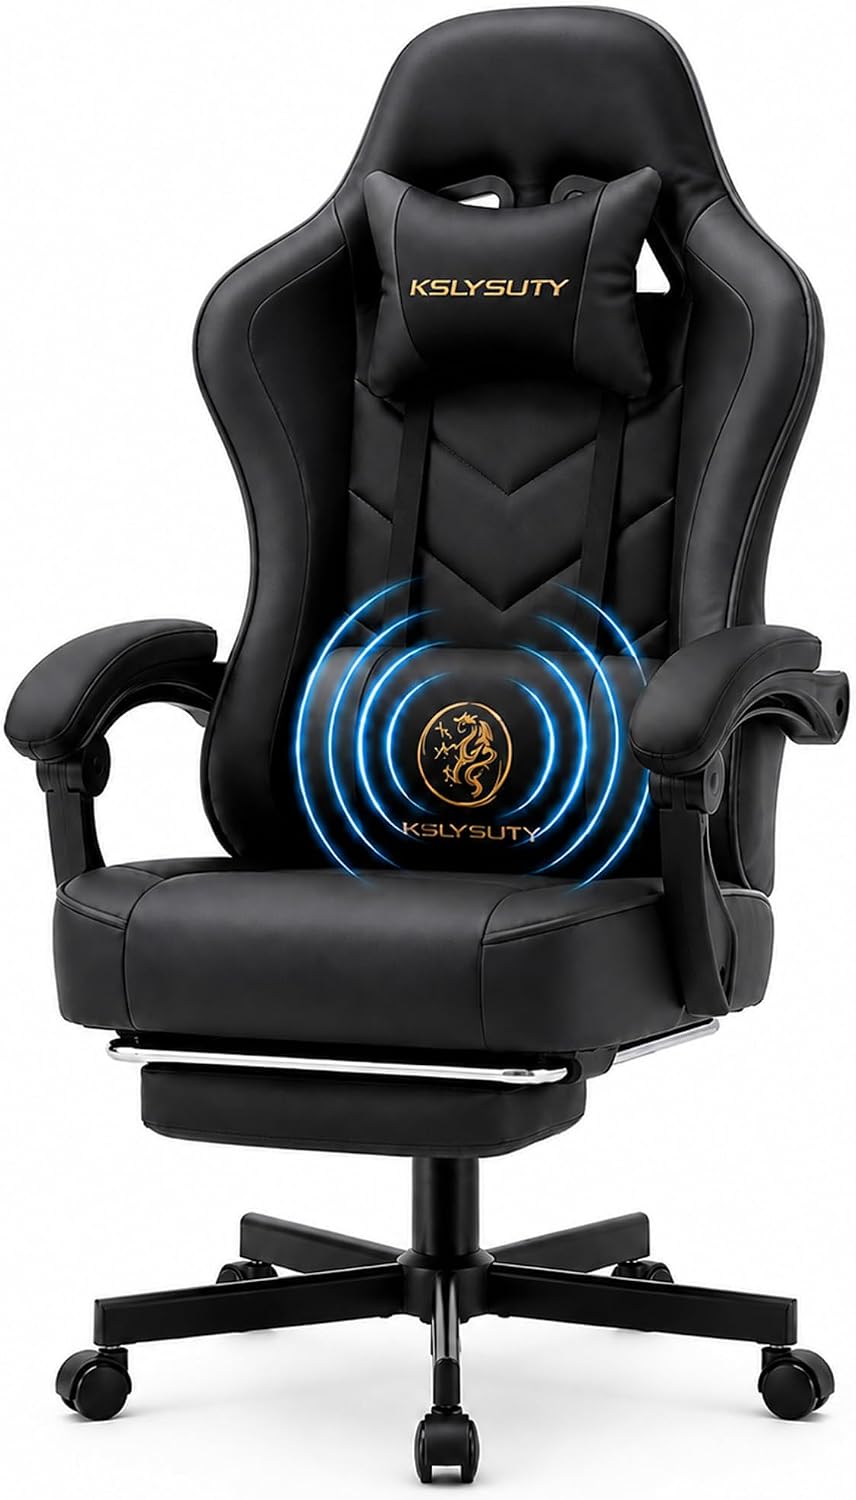
Budget pick: Office Desk Computer Gaming Chair for Adults, Ergonomic High Back Gamer Chair with Massage and Pocket Spring Cushion, Swivel Comfy Video Game Chairs with Footrest and Lumbar Support (Black)
 Visit on Amazon →
This is the chair I point a new player at when they are sitting on a kitchen chair and their back hurts after two hours. The feature list covers the essentials: high back, lumbar support, a pocket spring cushion, a footrest, and a swivel base. The pocket spring cushion is the interesting part, because springs spread your weight differently than a slab of foam, and for long sessions that usually means less of a hot spot under your thighs. The footrest matters more than people admit. Being able to lean back and get your feet up between matches takes the load off your lower back, and it is the reason this chair works for a console or handheld setup where you are not glued to a desk.
The massage function is a vibration motor, not therapy. Treat it as a nice thing on a rest day, not as a reason to skip standing up every hour. Same with the word ergonomic on the box: a chair is ergonomic when it fits you, and that depends on whether the lumbar piece moves. Put your hands on it before you commit, and if it is welded in place, plan on adding a lumbar cushion.
Flaws but not dealbreakers: This is a budget build, so the foam will compress over a couple of years of daily use, and the materials will not feel like a premium chair. That is the trade you are making for the price.
This is the right call for a first real chair, a dorm room, a teen's setup, or a second station in the living room.
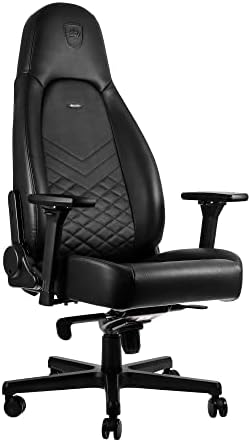
Upgrade pick: noblechairs ICON Gaming Chair and Office Chair with Lumbar Support, PU Faux Leather, Black
 Visit on Amazon →
This is the one I recommend to players who want the gaming chair look but refuse to sit in a toy. noblechairs is the brand I trust to build a chair that looks like a racing seat and behaves like an office chair, which is the compromise I make for people who care about how their setup looks on stream.
The honest caveat, and it comes straight from my own bias: this is PU faux leather, and PU runs hot. I coach on mesh for exactly that reason. In a Los Angeles July, leather and skin do not get along, and if you sweat through an eight-hour day you will be peeling yourself off the seat by hour four. If your room runs cool, or you keep a fan on your legs, this is a non-issue. If it does not, budget for a mesh chair instead and accept the plainer look.
The other thing to verify in person is the lumbar element. The chair is sold with lumbar support, and my rule is that support you cannot move is decoration, so check how much travel it has before you decide it is your chair. Build quality and long-term shape retention are where this one earns its place over the budget pick, and that is the whole reason it exists in this guide.
Flaws but not dealbreakers: Heavy, and the faux leather needs wiping down if you eat at your desk. Neither is a reason to skip it.
This is for the player who sits eight hours a day, wants the racing silhouette, and is done replacing chairs.
The actual setup workflow
Now the part that matters more than either chair. Do these in order, because each step depends on the one before it.
Step one: Seat height. Set it so your feet rest flat on the floor and your hips sit level with, or a little above, your knees. If your feet dangle, your thighs take the pressure and your lower back pays for it. If your desk is too tall after this, raise the chair and get a footrest, which is one reason the budget chair's footrest is a real feature and not filler.
Step two: Seat depth. You want two to three fingers of space between the back of your knee and the front edge of the seat. Too long and the edge digs into your calves and pulls your hips forward. Too short and your thighs hang off, which puts all your weight on your sit bones. Some chairs slide the seat pan, some do not. If yours does not, a lumbar cushion behind you is how you shorten the effective depth.
Step three: Lumbar height. Find the piece that touches your back and move it until it sits in the small of your back, the inward curve just above your belt line. Not your mid back, not your shoulder blades. If it is fixed, a rolled towel or a strap-on cushion does the same job for a few dollars, and it will out-perform most built-in bumps.
Step four: Recline and tilt tension. Lock the chair at roughly 100 to 110 degrees, which is a slight lean, not a slump and not a rigid 90. Sitting perfectly upright for eight hours is its own kind of damage. Set the tension so the chair holds that angle when you let go, and unlock it only when you want to move.
Step five: Armrests. Get your elbows to about 90 degrees and your shoulders down and back. Then bring the armrests up to meet your elbows, not the other way around. If your armrests only go up and down, you will end up with your arms too far forward, which rounds your upper back over the course of a scrim block.
Step six: Monitor height. Top of the screen at eye level, about an arm's length away. Your chair can only fix so much. If you are looking down at a laptop all day, your neck undoes everything the lumbar piece is doing.
Step seven: The hourly reset. Stand up once an hour, even between maps. Sixty seconds, hands on your hips, a short hip flexor stretch each side. This is the cheapest fix in the entire guide and the one players skip, which is why I say it out loud in every review session.
What I would skip and why
Skip the bucket seat. A racing-style chair with deep side bolsters is a car seat bolted to a base, and it does one thing well: it holds you in place during lateral G-forces you will never experience at a desk. At a desk it pulls your hips forward, rounds your lower back, and makes it impossible to sit with your knees and hips in a healthy relationship. It is a marketing shape, and your posture is the casualty.
Skip fixed lumbar bumps. Skip armrests that only go up and down. Skip anything that wobbles after a few months, because a chair that rocks side to side while you aim is a chair that is teaching you to tense up.
And skip the idea that a chair is a one-time purchase you never think about again. Recheck your setup every few months. Bodies change, and foam compresses.
What this costs
The budget chair and the ICON sit at very different points on the price scale, and you should check current Amazon price on both before you decide. What matters is the math over time, not the sticker. A cheap chair you replace every eighteen months costs more per year than a good chair you keep for six or seven, and it costs you in back pain on top of that.
The setup work is free. Seat height, seat depth, lumbar height, recline, armrests, monitor height. Twenty minutes with an Allen key and a wall measurement, done once, then repeated whenever something feels off.
That is the whole job. A chair is a chair first and a gaming product second. Get the base right, move the lumbar to where your back actually curves, lock the tilt, and stand up once an hour. Do that and the chair stops being the reason your back hurts.